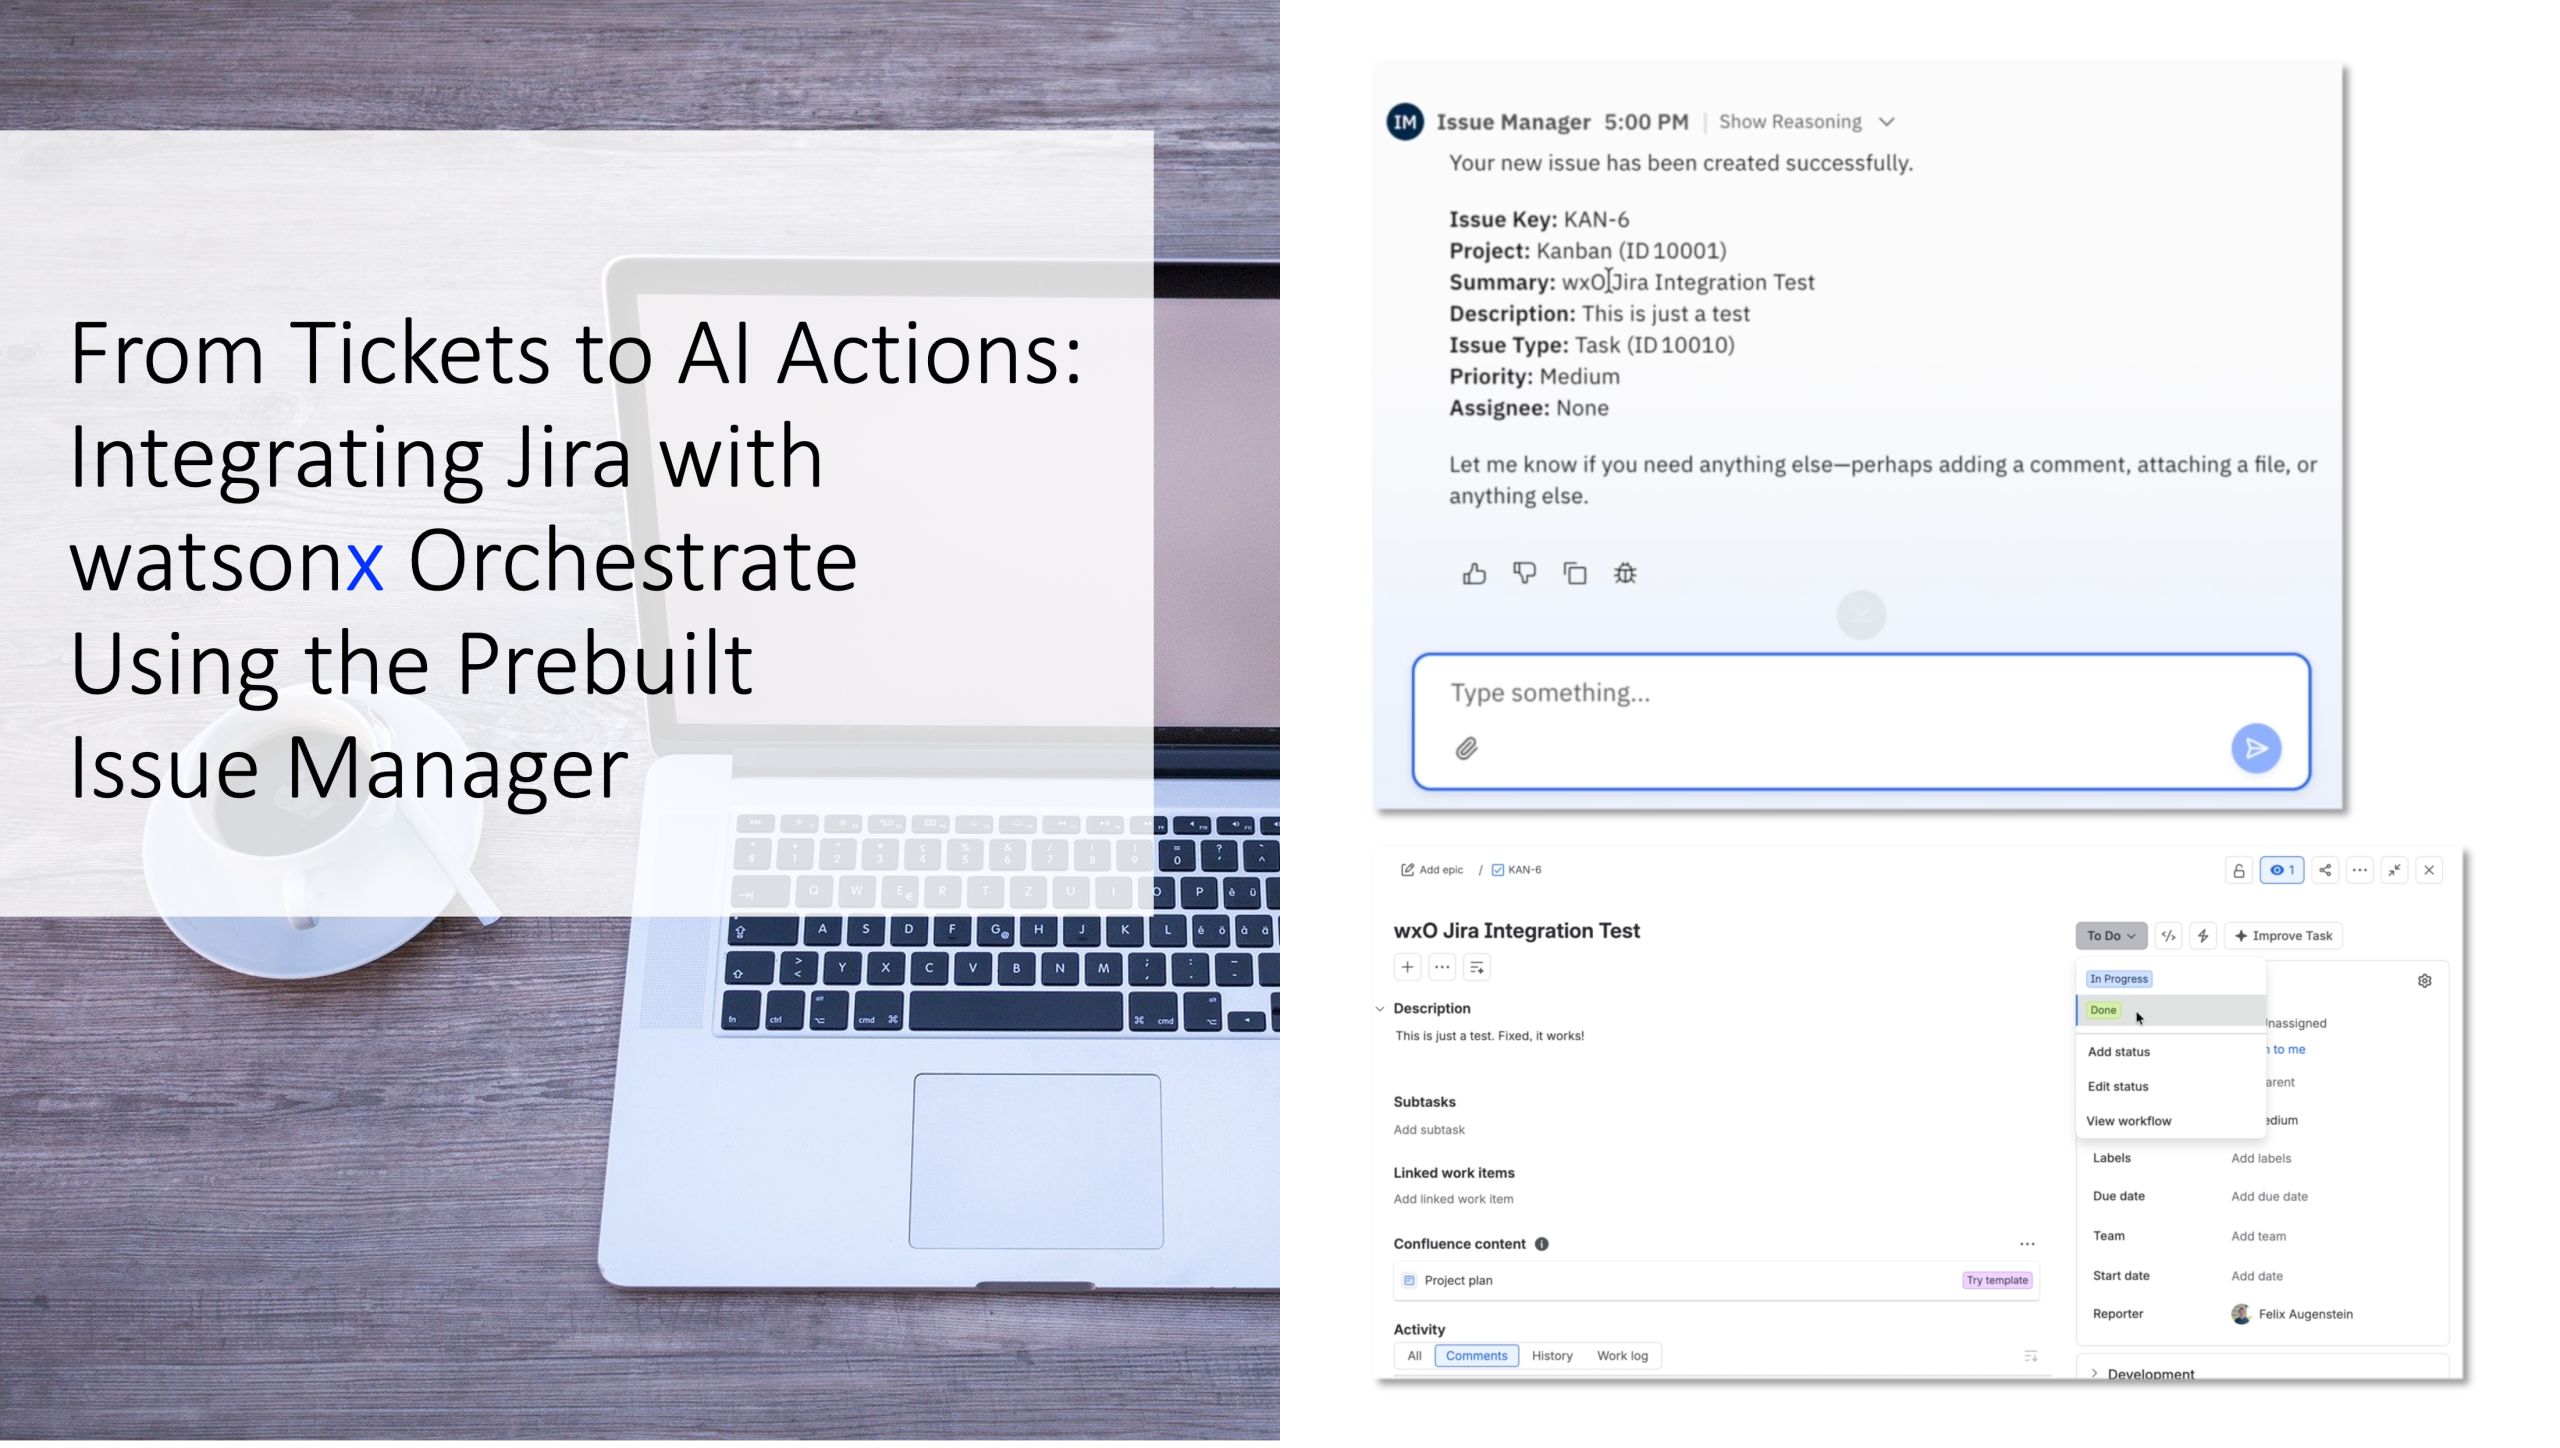
One of the most exciting aspects of Agentic AI is moving beyond chat and actually performing actions in enterprise systems.
Imagine asking:
“Create a high-priority bug for a login timeout issue and assign it to the development team.”
Instead of just explaining how to do it, an AI agent connects to Jira, creates the issue, updates the appropriate fields, and returns the ticket number. That’s exactly what IBM watsonx Orchestrate (wxO) enables through its prebuilt Jira integrations.
In this blog post, I’ll walk through how I connected Jira Cloud to watsonx Orchestrate using the prebuilt Issue Manager agent from the wxO Catalog, what happens behind the scenes, and some lessons learned during setup.
Why Integrate Jira with watsonx Orchestrate?
Many business processes eventually end up in a ticketing system.
Typical examples include:
- Reporting software defects
- Creating user stories
- Tracking enhancement requests
- Managing operational tasks
- Monitoring project work
Instead of switching between tools and manually creating tickets, users can simply describe what they need in natural language.
For example:
- Create a bug for failed authentication in the customer portal.
- Show me all open issues assigned to me.
- Update KAN-12 and move it to In Progress.
- What is the status of the password reset story?
The agent handles the Jira interaction and translates user intent into API calls.
Meet the Issue Manager Agent
IBM provides a prebuilt Issue Manager agent in the watsonx Orchestrate Catalog.
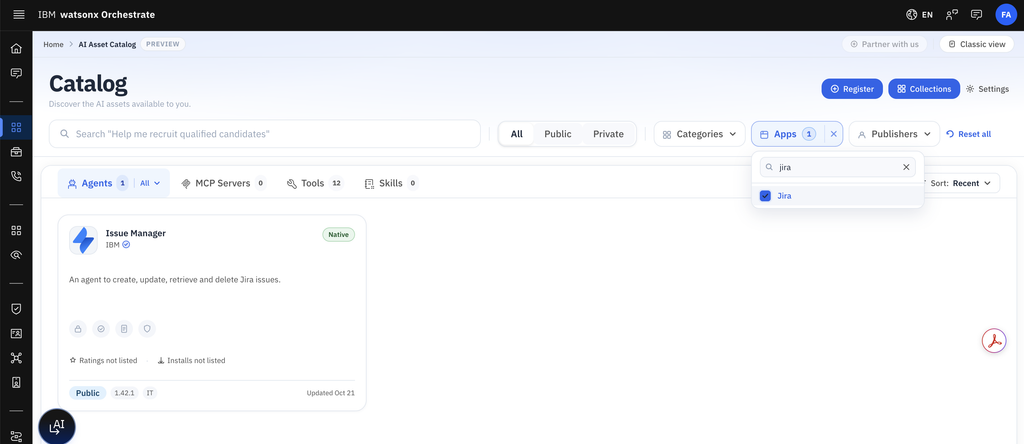
This agent already includes multiple Jira tools, including capabilities such as:
- Create issues
- Retrieve issues
- Update issues
- Delete issues
- Retrieve status information
- Discover projects
- Retrieve issue types
- Retrieve users
- Retrieve priorities
Because these tools are already packaged and governed, there is no need to build custom APIs or write code.
You simply configure the Jira connection and the agent can immediately begin interacting with your Jira environment.
Creating a Jira Project for the Demo
For demonstration purposes, I created a simple Jira Cloud project using the Kanban template.
The project contained the following work types:
- Epic
- Story
- Bug
- Task
- Subtask
Kanban is an ideal starting point because it provides a simple workflow:
- To Do
- In Progress
- Done
There are no sprint configurations, backlog management activities, or additional Scrum artifacts that need to be configured beforehand.
For demo environments, simplicity is usually your friend.
Understanding the OAuth Connection
Before the agent can create issues, it needs permission to access Jira.
This is where OAuth 2.0 comes into play.
In simple terms:
- watsonx Orchestrate asks Jira for permission.
- The user approves access.
- Jira provides a secure access token.
- wxO can now perform approved actions on behalf of the user.
No passwords need to be shared between systems.
A key component of this process is the Callback URL.
Think of it as the return address.
The flow looks like this:
- wxO sends the user to Jira.
- The user approves access.
- Jira sends the user back to wxO using the Callback URL.
Without a valid Callback URL, the OAuth flow cannot complete.
Setting Up the Atlassian OAuth Application
The first major step is creating an OAuth 2.0 application inside the Atlassian Developer Console.
When creating the application, you will need:
- An application name
- OAuth 2.0 (3LO) authentication
- The wxO Callback URL
- Appropriate Jira API permissions
One lesson learned during setup:
Account-Level Access worked successfully, while Resource-Level Access caused repeated authentication challenges during testing.
If you encounter unexplained authentication issues, this is one setting worth verifying.
Configuring OAuth Permissions
The application requires Jira permissions, called scopes.
Scopes determine what the application is allowed to do.
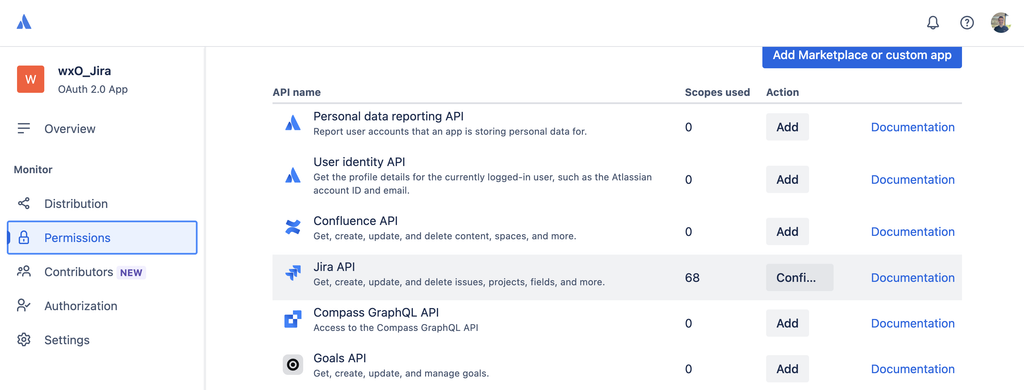
Examples include:
- Reading Jira issues
- Creating issues
- Updating issues
- Viewing users
- Managing project information
One of the most confusing parts of the setup was identifying the correct scope configuration.
Initially, I tried using only a minimal set of Jira scopes.
Although the authorization screen appeared correctly, the final authentication process repeatedly failed.
The solution was to use the complete scope set generated by Atlassian’s Classic Jira Platform REST API configuration.
Once the proper permissions were configured, authentication completed successfully.
Configuring the Jira Connection in watsonx Orchestrate
Inside watsonx Orchestrate, the prebuilt Jira connection must be configured. Go to connections and search for the prebuilt connection for Jira with OAuth, click the dots on the right and edit connection.
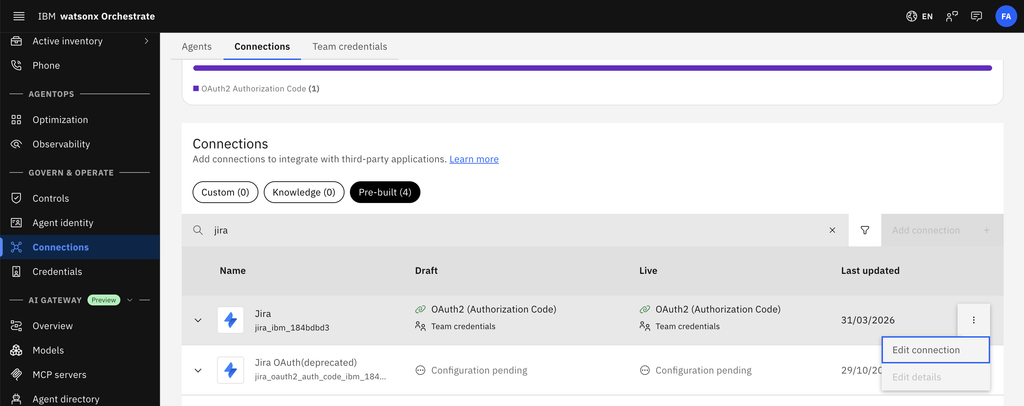
The connection requires:
- Server URL (“https://api.atlassian.com“)
- Authorization URL (“https://auth.atlassian.com/authorize“)
- Token URL (“https://auth.atlassian.com/oauth/token“)
- Client ID (You will find this in the Jira Developer Console, your created app, then go to Settings)
- Client Secret (You will find this in the Jira Developer Console, your created app, then go to Settings)
- OAuth scopes (insert these scopes: “read:jira-work manage:jira-project manage:jira-configuration read:jira-user write:jira-work manage:jira-webhook manage:jira-data-provider”)
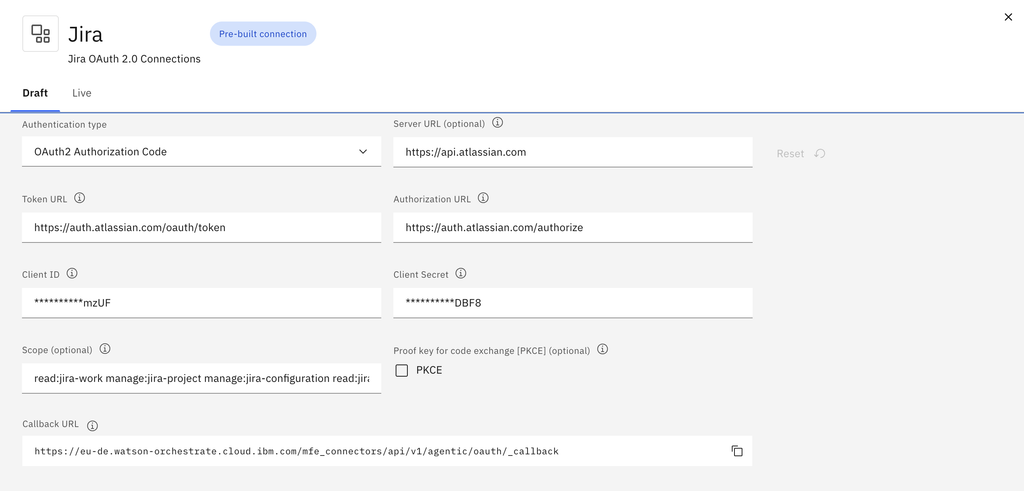
In addition, one important parameter needed to be added manually:
audience = api.atlassian.com
Without this value, authentication completed up to the consent screen but failed afterward.
This was perhaps the most important troubleshooting discovery during the implementation.
If you switch to “Live” you can just “Paste Draft Configuration” and then save as Team Credentials so other can use the credentials as well.
The Biggest Troubleshooting Lessons
Like many integrations, most of the effort was not spent on creating tickets but on configuring authentication correctly.
Some of the most important lessons learned:
1. The Consent Screen Doesn’t Mean Success
I initially assumed that because Atlassian displayed the authorization screen, everything was configured correctly.
In reality, the OAuth process can still fail after consent has been granted.
Always verify that the token exchange completes successfully.
2. Scope Configuration Matters
Using incomplete scopes resulted in repeated failures.
If authentication issues persist, review the generated authorization URLs and compare them with the configured scopes.
3. Verify the Audience Parameter
The OAuth flow ultimately succeeded only after ensuring that:
- audience = api.atlassian.com
was included.
4. Use Team Credentials for Shared Demos
For customer demonstrations, Team Credentials are often easier because users do not need to perform individual authentications.
5. Test Incrementally
Start with simple validation steps:
- Retrieve projects
- Retrieve issue types
- Retrieve users
Only then move on to:
- Create issue
- Update issue
- Change status
This makes troubleshooting dramatically easier.
Demonstrating the Integration
Once connected, the experience becomes surprisingly natural.
A user can ask:
“Show my Jira projects.”
The agent retrieves available projects.
Next:
“What issue types exist in project KAN?”
The agent identifies available work item types.
Finally:
“Create a bug in project KAN for login timeout issues affecting customer portal users.”
The agent creates the issue and immediately returns the newly generated Jira ticket.
From the user’s perspective, it feels less like interacting with Jira and more like collaborating with a digital team member.
Why This Is a Great Agentic AI Use Case
Many AI demonstrations focus on summarization or question answering.
While useful, these scenarios don’t always show business value.
The Jira integration demonstrates something much more tangible:
- Real authentication
- Real enterprise systems
- Real APIs
- Real business outcomes
The AI is no longer just providing information.
It is performing work.
That shift from information retrieval to action execution is what makes agentic workflows so powerful.
Final Thoughts
The combination of Jira Cloud and watsonx Orchestrate provides a practical example of how Agentic AI can automate everyday business processes.
Using the prebuilt Issue Manager agent, organizations can quickly enable conversational interactions with Jira without building custom integrations from scratch. Users can create, update, retrieve, and manage issues through natural language while maintaining the security and governance controls provided by OAuth 2.0.
The setup process requires some attention to detail, particularly around OAuth configuration and scopes, but once the connection is established, the result is an impressive demonstration of AI-driven task execution.
From creating tickets to managing project workstreams, the integration transforms Jira from a system users navigate manually into a platform they can interact with conversationally through AI.